Back to recent
How to set up E-Mail notifications in SQL Server when a Server agent job fails
Creating jobs in SQL Server Agent is an awesome way to automatize processes like running T-SQL scripts or executing SQL Server Integration Services (SSIS) packages. But what if a job or a step fails? Surely you’d want to know about that! Opening the job history at random intervals in order to check if everything works accurately is not a good way of securing a proper functionality. Instead you could use the very nifty option of email notifications! Any time a job fails you are instantly notified in your email inbox and can start troubleshooting.
This tutorial will tell you exactly what you need to do in order to keep track of possibly malfunctioning Server Agent jobs. Ready? Let’s go!
1. Set up Database Mail
This is probably the most difficult part of the whole process. But don’t fret! This tutorial exists to guide you.
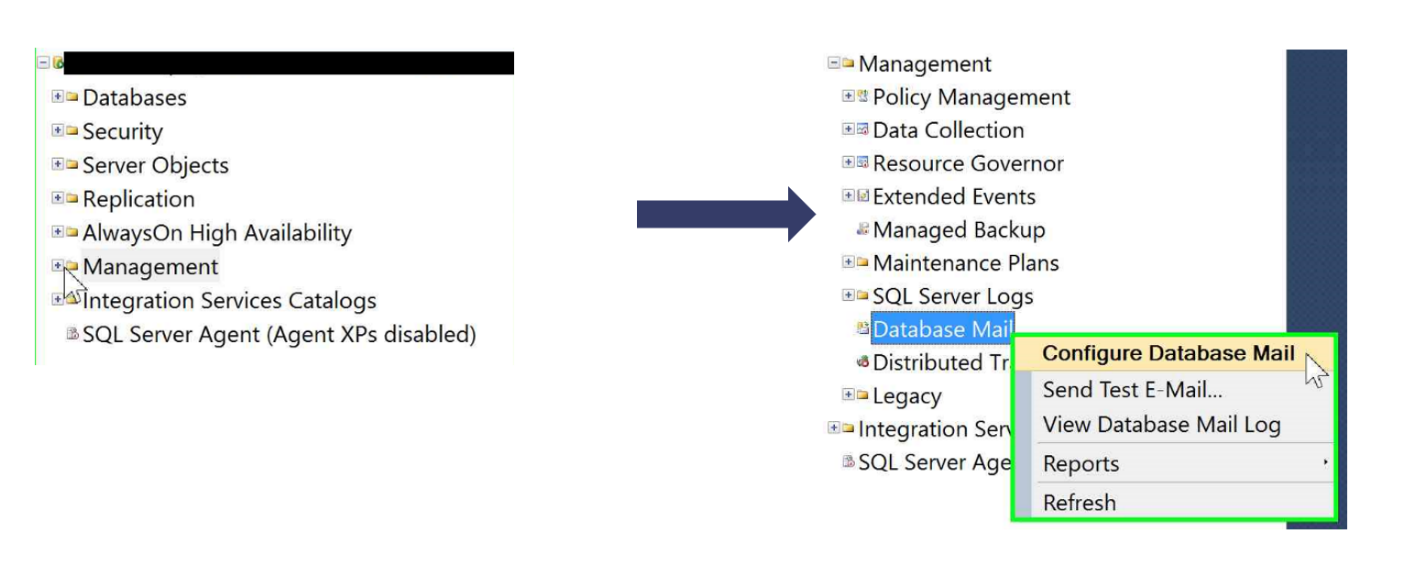
In SQL Server Management Studio (SSMS) you will first have to connect to the Database Engine. Then, expand Management. Locate Database Mail, right click and click Configure Database Mail.
A wizard will open. Click “Next”, choose “Set up Database Mail by performing the following tasks” and click “Next” again. When the pop-up opens, simply choose “Yes”.
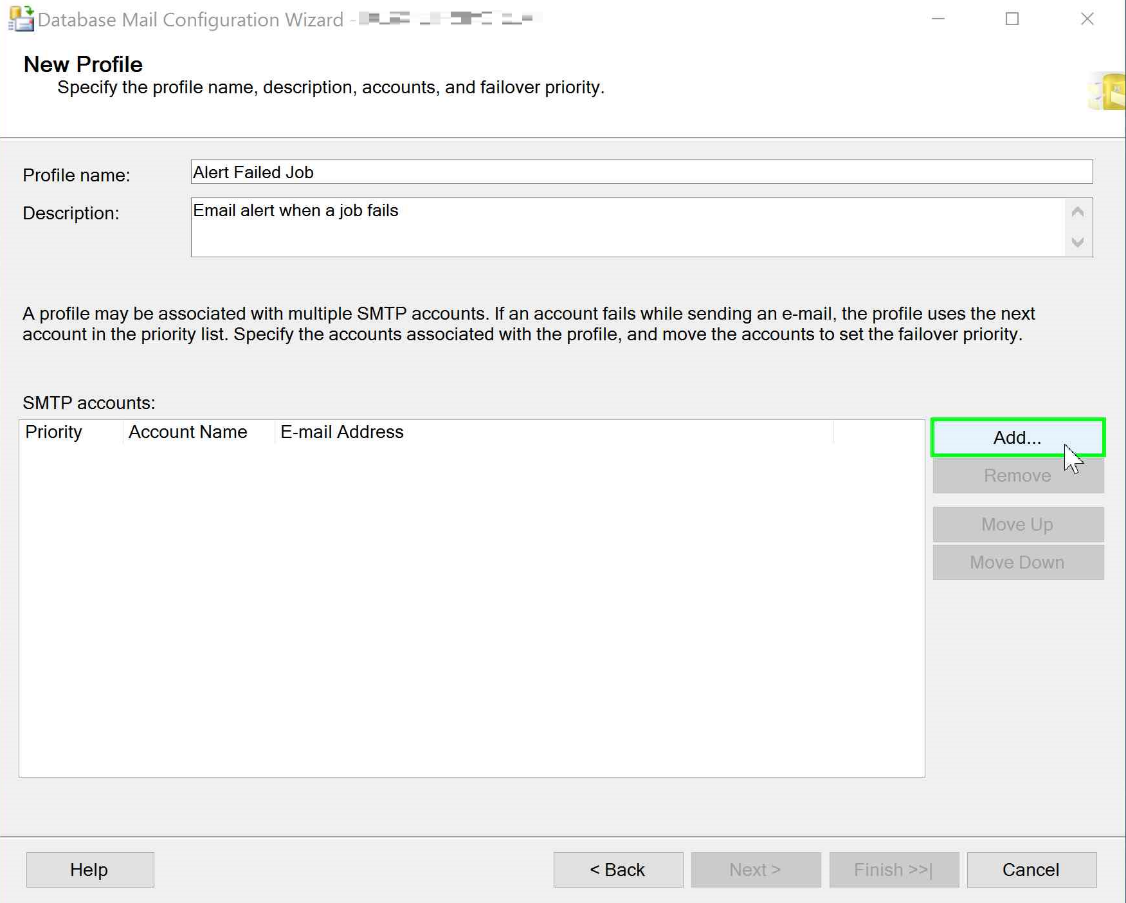
Now it’s time to create a profile for your mail account. First give your profile a unique name. You are allowed to get more creative than me! If you want to you can also add a description to further explain the meaning of your specific profile. Now comes the important part: Under SMTP accounts click “Add”.
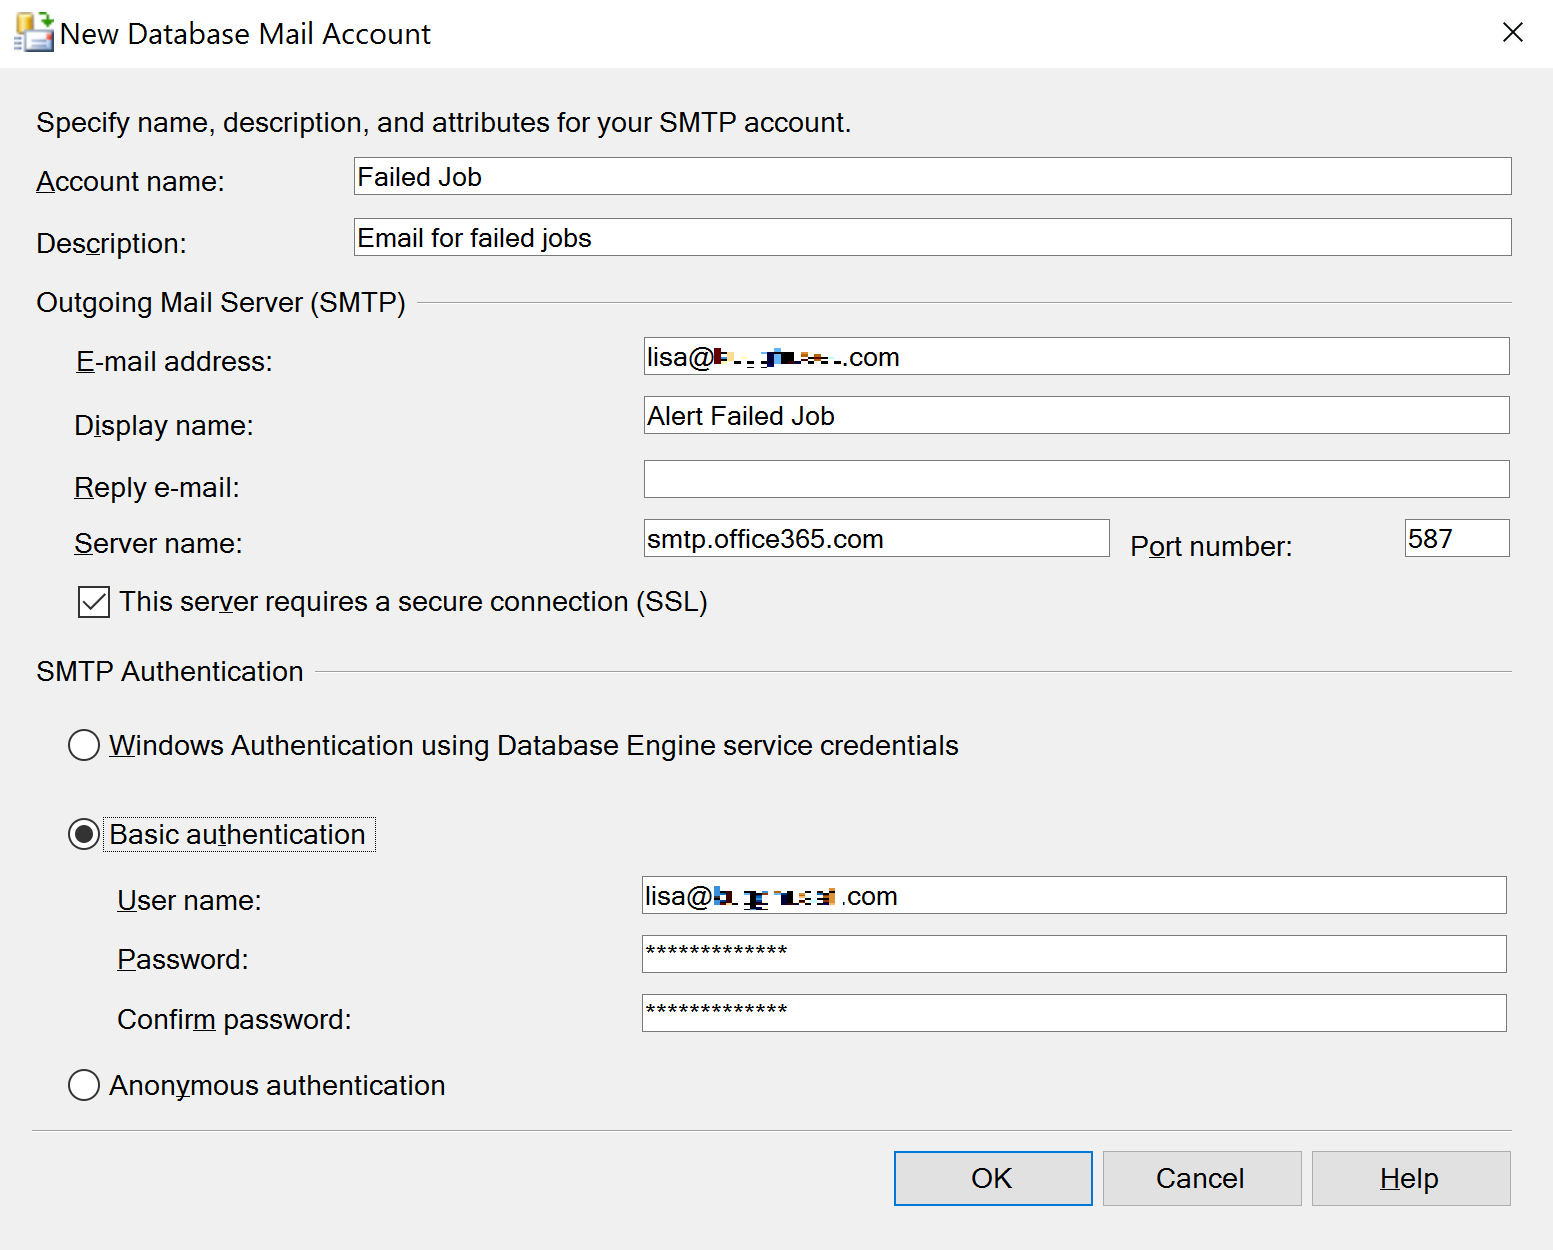
Surprise! A new window will open. You will need to fill in the specific details of your mail account. Below you will see the general logic of the information you need to enter.
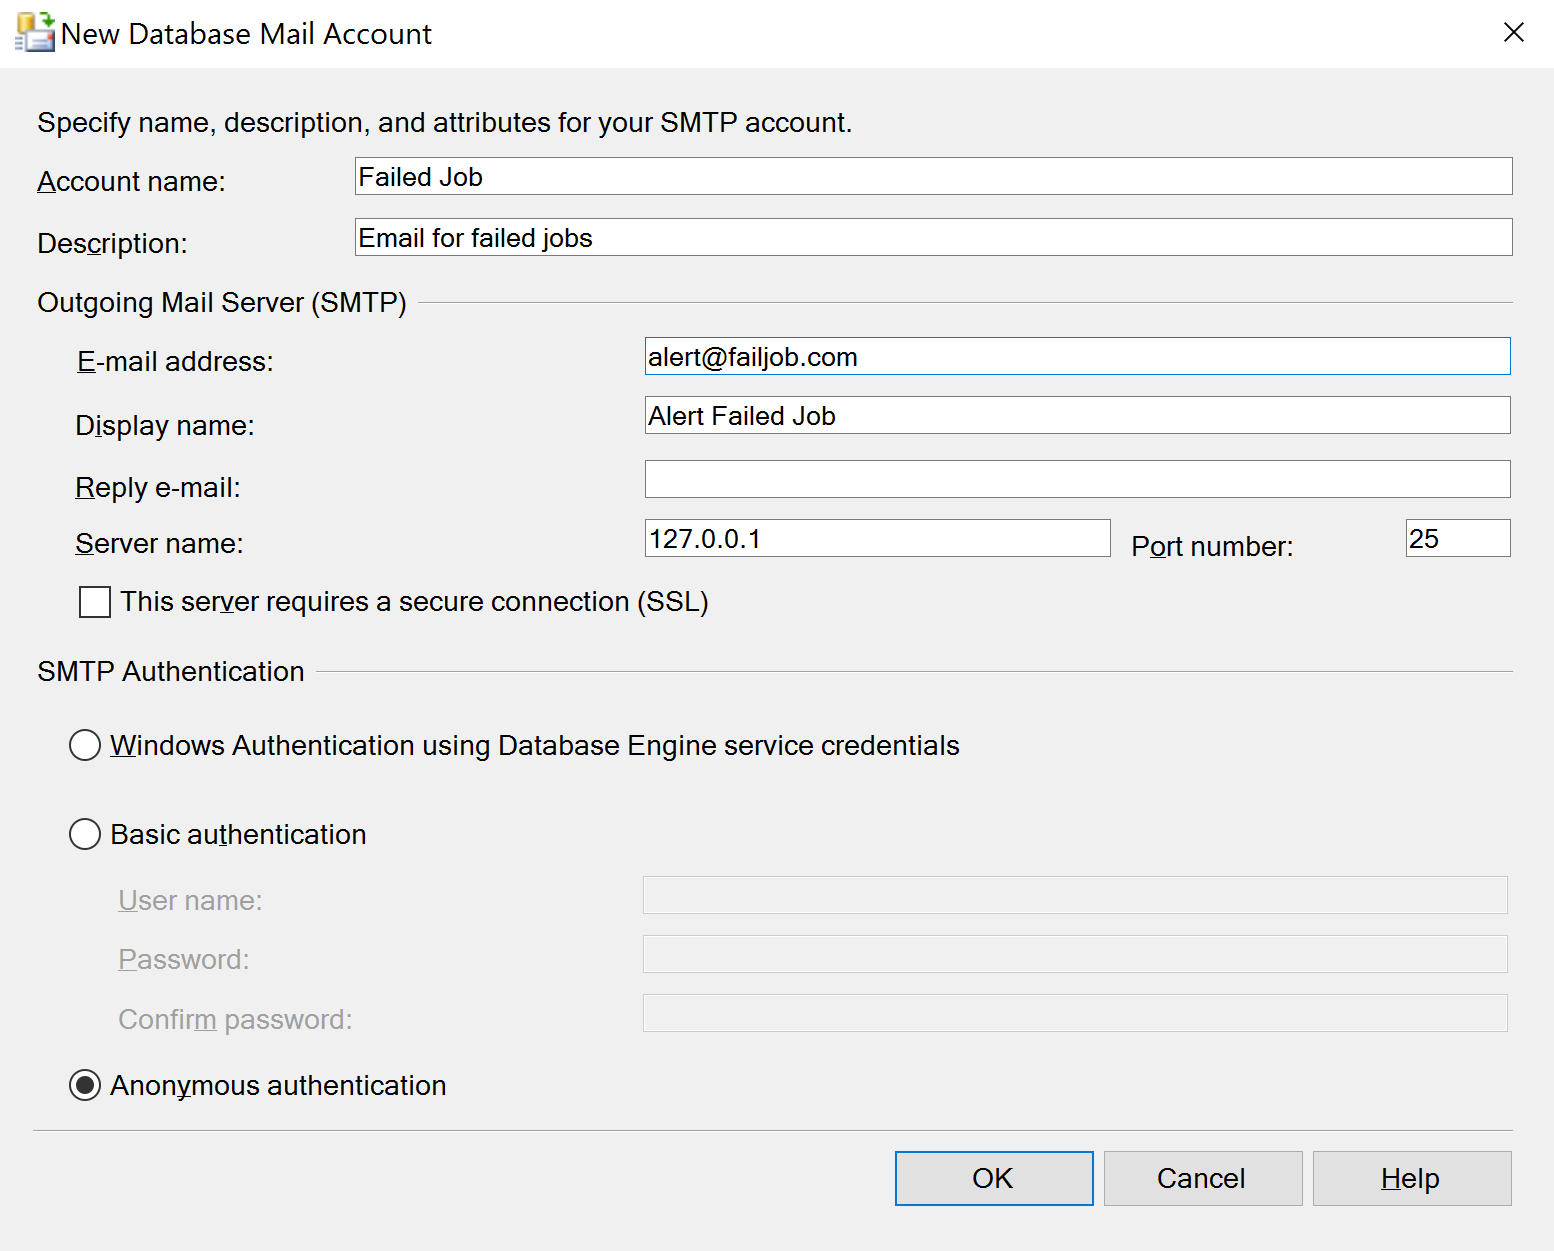
In order to make this work for you, you have to enter a valid E-mail address, of course. Your server name and port number depend on the mail service you are using. More often than not SSL is required. Also it’s probably a good idea to use Basic authentication where you enter your e-mail and password.
Here is a handy little list of settings for the most common services:
Outlook Office 365:
Server name: smtp.office365.com		Port number: 587		SSL required: Yes

Outlook.com:
Server name: smtp-mail.outlook.com		Port number: 587		SSL required: Yes

Hotmail:
Server name: smtp.live.com			Port number: 465		SSL required: Yes

Gmail:
Server name: smtp.gmail.com			Port number: 465		SSL required: Yes

Yahoo:
Server name: smtp.mail.yahoo.com		Port number: 465		SSL required: Yes

iCloud Mail:
Server name: smtp.mail.me.com		Port number: 587		SSL required: Yes
So, what will your Database Mail Account look like? Well, I have no idea, so take a look at mine and get inspired!
Now, click “OK”. You will see your profile added to the previous window. Continue by clicking “Next”. You will now have the option to make that profile public, or set it to private. To decide what suits your need you can read specifications here https://msdn.microsoft.com/en-us/library/ms177224(v=sql.105).aspx, and here https://msdn.microsoft.com/en-us/library/ms178377(v=sql.105).aspx, respectively. In this tutorial, I will set the profile to public and also make it my default profile.
Click “Next”. The following window allows you to configure your system parameters. Leave them at default for now. If you have to change anything at a later time you can always come back, so don’t worry about this now. If you really are curious you can always check this: https://msdn.microsoft.com/en-us/library/ms189004(v=sql.105).aspx.
Click “Next” once again, then “Finish” and watch the configuration window exclaim “Success” a few times. If you want to you can send a test e-mail to yourself. Right click on Database Mail and choose “Send Test E-mail”.
Congratulations! You’ve successfully set up Database Mail. Are we good to go now? Not quite yet! We still have to somehow link this mail to our Server Agent to make use of it there. Let me tell you how.
2. Create an Operator
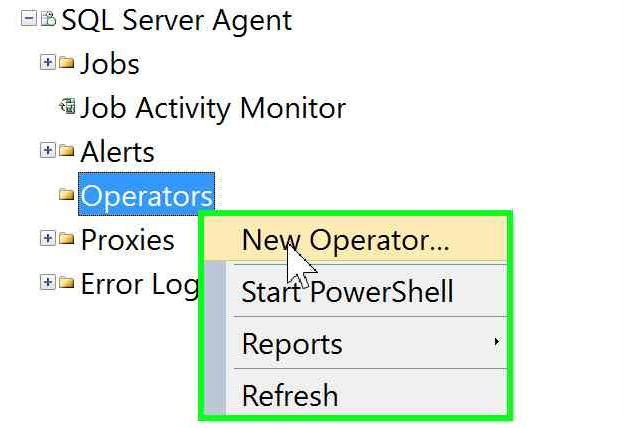
Now that we have the Database Mail in place it’s time to shift our focus to the SQL Server Agent. First, make sure it’s enabled. If it’s not, simply right click on it and choose “Start”. Now, expand the Server Agent, right click on “Operators” and choose “New Operator”.
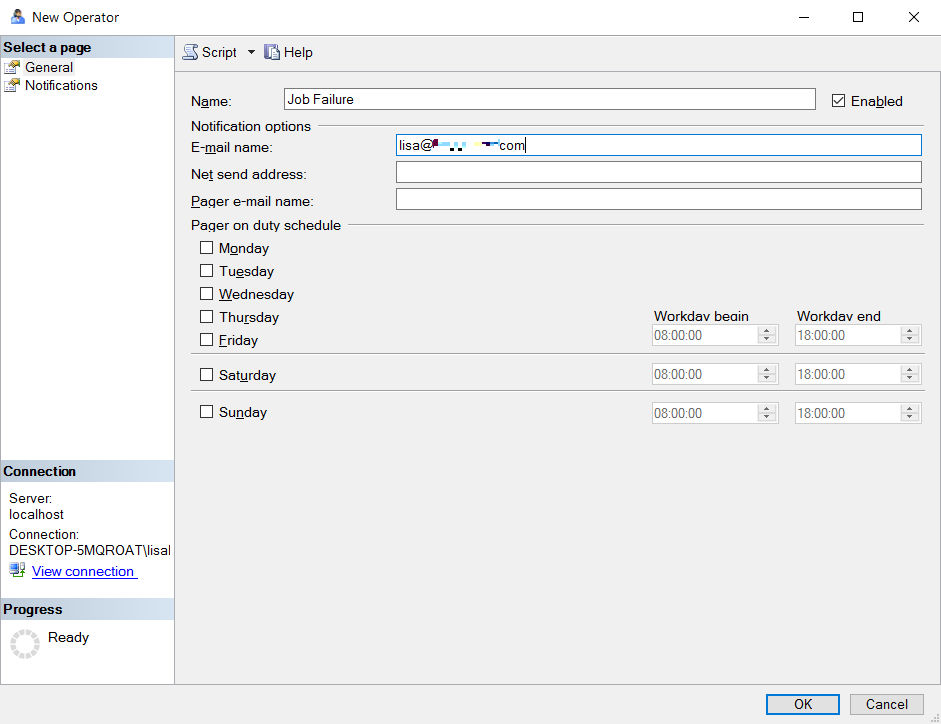
In the new window give a name to the operator and enter a valid e-mail address (for instance the same you used for Database Mail). Click “OK”.
3. Add Notification to you SQL Server Agent job
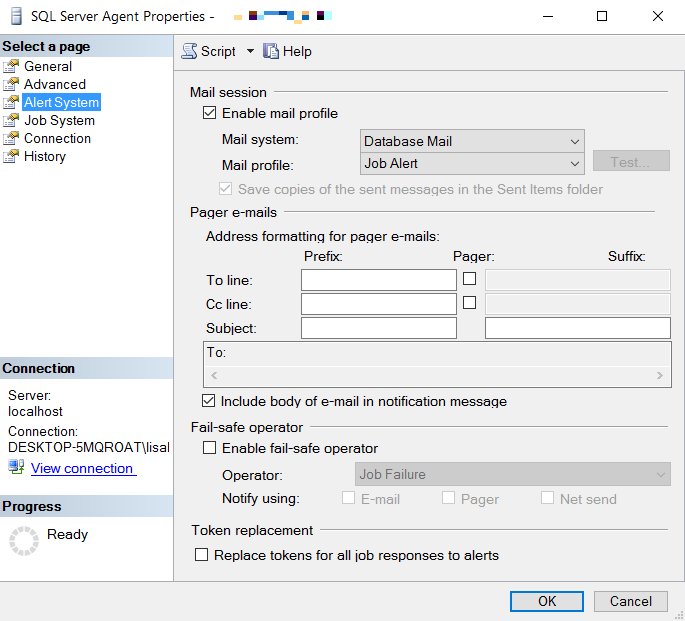
Good job! You’re almost done! There are only a few small things left to do. You have to make sure that the SQL Server Agent is set to allow E-mail Notifications. To do so, right click on the SQL Server Agent and select “Properties”. Go to “Alert System” and check “Enable mail profile”. Choose “Database Mail” for Mail System and select your Mail Profile (in this case “Job Alert”). Click “OK”.
Awesome! You’re almost done! You only have to link everything to your specific job. This is how it’s done: Under SQL Server Agent, expand “Jobs”. Right click on the job you want to get notifications from. Choose “Properties”. Go to “Notifications” and check “E-mail”. Select the operator from the drop down list and pick “When the job fails” from the drop down list right next to this.
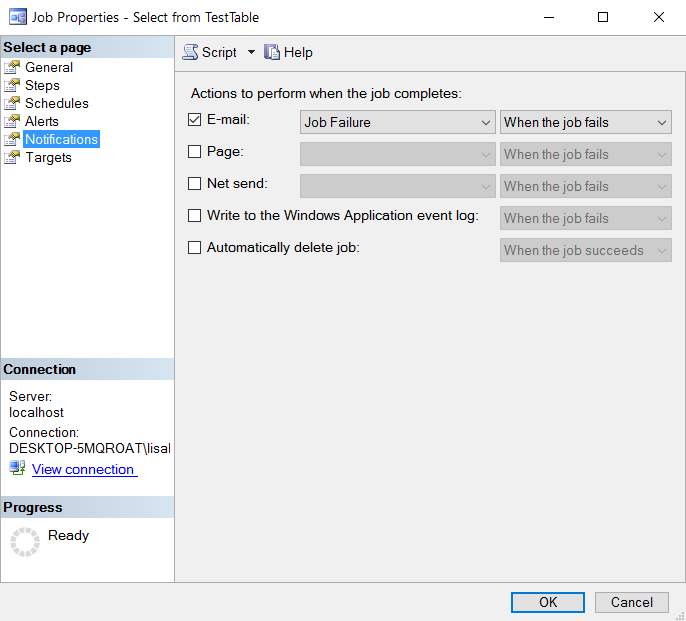
You will notice the possibility of choosing “When the job succeeds”. This is great for testing purposes or simply for sending you notifications reminding you how awesome you are at creating Server Agent jobs!
Congratulations once again! You have successfully set up and configured e-mail notifications for SQL Server Agent jobs!